
Vegetable Vessels
Designer - Karen Nicholson of Albany, NY
Materials:
- Creative PaperclayŽ modeling material
- Plastic wrap
- Rolling pin
- Plastic knife, Xx-acto knife, or other cutting tool
- Acorn squash, mini pumpkin, gourd, apple, etc.
- Heat tool
- Lumiere paints by Jacquard
- Paint brush
- Acrylic sealer
- Optional embellishments: beads, metal leaf, charms, feathers, gems, etc.
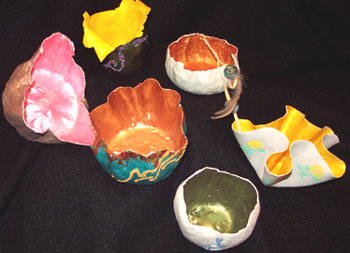
Procedure:
- Choose a hard squash or fruit that will stand up by itself. Wrap it tightly in plastic wrap.
- Working on a smooth, clean surface, roll the PaperclayŽ into a circle between two layers of plastic wrap until it is almost paper thin. The amount of PaperclayŽ you will need depends on the size of your squash. Start with approximately 2 ounces. If your squash is heavy (some acorn squash), reinforce the center of the circle where the squash will rest with a second thin layer of PaperclayŽ.
- Remove the top layer of plastic wrap and place the squash in the center. Make several slices in the PaperclayŽ from the edge of the squash to the edge of the circle.
- Lifting one "petal" of PaperclayŽ at a time, press it tightly against the squash. Allowing for a small overlap, remove excess PaperclayŽ and press the seam smooth with your fingers where the "petals" join. Continue all the way around the squash.
- Using an embossing heat tool or hair dryer, carefully heat the outside of the vessel until it is dry to the touch (just a few minutes). Be careful not to melt the plastic wrap.
- Carefully loosen the plastic wrap on the squash, and remove the squash from the vessel. The vessel will stand on its own. Do not worry if the PaperclayŽ rips a bit - it is still moist enough to repair after the squash has been removed.
- Carefully remove the plastic wrap from the inside of the vessel. Gently smooth the inside of the seams. Use the heat tool to dry the inside.
- The vessel can be dried completely with the heat tool, or be left overnight to dry.
- When the PaperclayŽ is dry, paint the vessel with Lumiere paints. If desired, add beads or other embellishments.
- Let dry, and spray with an acrylic sealer.